Spring Boot & Hilla | Building a simple web user interface
In this article, I will show you how you can employ the Hilla library to build the web user interface for your Spring Boot.

In this article, I will show you how you can employ the Hilla library to build the web user interface for your Spring Boot.
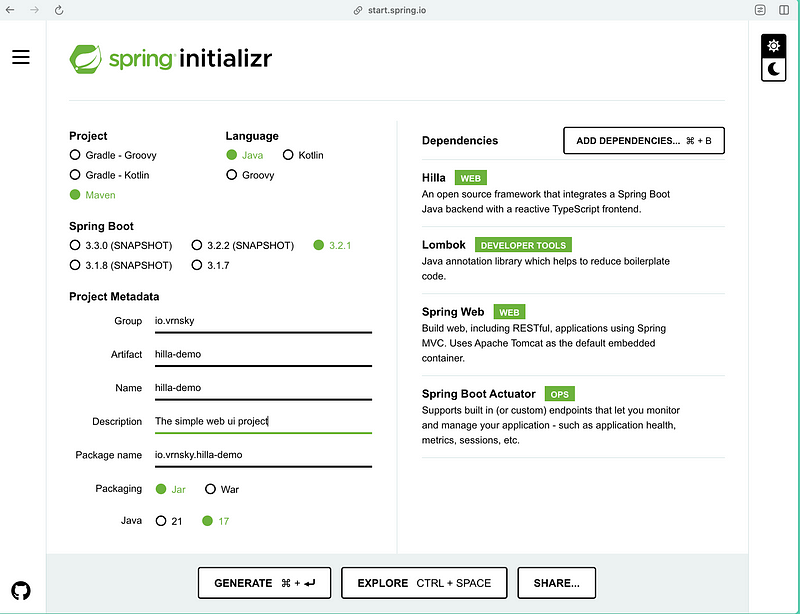
Let’s start with project initialization.
Vaadin developed the Hilla Library.
This article will develop a backend with CRUD operations to manage trains.
Let’s start with declaring data transfer objects.
package io.vrnsky.hillademo.dto;

import java.util.UUID;

public record Train(
        UUID id,
        int carriages,
        Status status,
        long mileage
) {

    public static Train withId(UUID id, Train train) {
        return new Train(id, train.carriages(), train.status(), train.mileage());
    }

}
The definition of the Status enum is below.
package io.vrnsky.hillademo.dto;

public enum Status {
    ACTIVE,
    DISABLED,
    MAINTENANCE
}
Now, it’s time to implement service layers and controller layers.
package io.vrnsky.hillademo.service;

import com.vaadin.flow.server.auth.AnonymousAllowed;
import dev.hilla.BrowserCallable;
import io.vrnsky.hillademo.dto.Status;
import io.vrnsky.hillademo.dto.Train;

import java.util.ArrayList;
import java.util.Collection;
import java.util.HashMap;
import java.util.List;
import java.util.Map;
import java.util.UUID;

@BrowserCallable
@AnonymousAllowed
public class TrainService {

    private final Map<UUID, Train> trains;

    public TrainService() {
        this.trains = new HashMap<>();
        this.trains.putAll(
                this.generateRandomTrains()
        );
    }

    public Train createTrain(Train train) {
        if (train.id() != null) {
            return updateTrain(train);
        }
        var uuid = UUID.randomUUID();
        var trainWithId = Train.withId(uuid, train);
        trains.put(uuid, train);
        return trainWithId;
    }

    public Train updateTrain(Train train) {
        if (trains.get(train.id()) == null) {
            throw new IllegalArgumentException("Train with ID = [" + train.id() + "] not exists");
        }
        var updatedTrain = Train.withId(train.id(), train);
        trains.put(train.id(), updatedTrain);
        return updatedTrain;
    }

    public Train getTrain(UUID id) {
        return this.trains.get(id);
    }

    public void deleteTrain(UUID id) {
        this.trains.remove(id);
    }

    public List<Train> list() {
        return new ArrayList<>(this.trains.values());
    }

    private Map<UUID, Train> generateRandomTrains() {
        Map<UUID, Train> trains = new HashMap<>();
        for (int index = 0; index < 10; index++) {
            var id = UUID.randomUUID();
            var train = new Train(
                    id,
                    index + 10,
                    index % 2 == 0 ? Status.MAINTENANCE : Status.ACTIVE,
                    index + 1000
            );
            trains.put(id, train);
        }
        return trains;
    }
}
Since security is not a point in this article, I will leave the controller available without authorization. The Hilla library utilizes Spring Security to protect your endpoints from unauthorized users. It is the reason why I have AnonymousAllowed annotation.
The one more annotation that instructs Spring Boot that this controller should be accessible for browser — BrowserCallable.
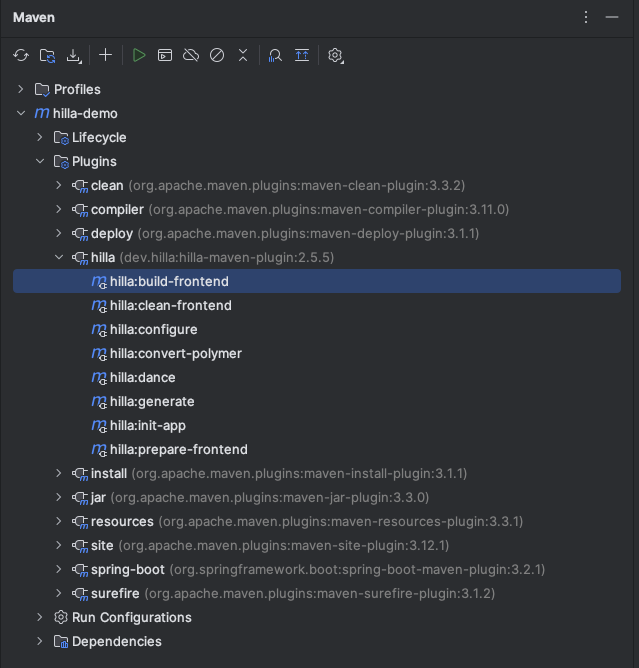
After that, we may run the Hilla maven plugin to generate the required for fronted structures.

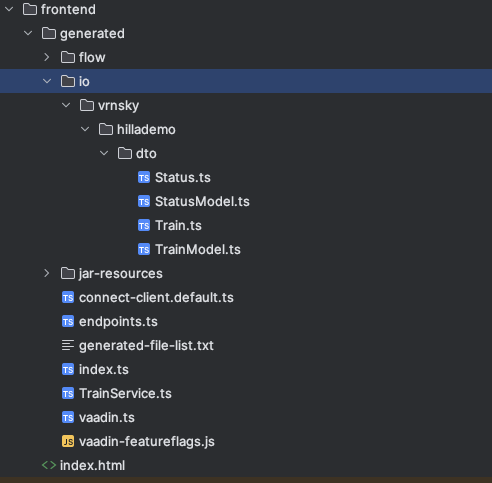
Inside the frontend/generated folder, you may see interfaces generated from your data transfer objects and services from the service definition.

Now, it’s time to implement a web user interface.
import {useEffect, useState} from 'react';
import {TrainService} from "Frontend/generated/endpoints";
import {Grid} from "@hilla/react-components/Grid";
import {GridColumn} from "@hilla/react-components/GridColumn";
import Train from "Frontend/generated/io/vrnsky/hillademo/dto/Train";

export default function TrainsView() {
    const [trains, setTrains] = useState<Train[]>([]);
    const [selected, setSelected] = useState<Train | null | undefined>();

    useEffect(() => {
        TrainService.list().then((trainsList) => {
            const validTrains = trainsList?.filter((train): train is Train => !!train) || [];
            setTrains(validTrains);
        });
    }, []);


    return (
        <div className="p-m flex gap-m">
            <Grid
                items={trains}
                onActiveItemChanged={e => setSelected(e.detail.value)}
                selectedItems={[selected]}>

                <GridColumn path="id"/>
                <GridColumn path="carriages"/>
                <GridColumn path="status"/>
                <GridColumn path="mileage"/>
            </Grid>

        </div>
    );
}
Before running the application, let’s customize its style.
To achieve that, you must create an inside frontend folder folder with name themes and all style-related code. In this article, I will stick with the example from Hilla docs.

Content of theme.json
{
  "lumoImports" : [ "typography", "color", "spacing", "badge", "utility" ]
}
To instruct our Spring Boot application to use this theme, we have extended AppShellConfigurator in our runner class and added Theme annotation.
package io.vrnsky.hillademo;

import com.vaadin.flow.component.page.AppShellConfigurator;
import com.vaadin.flow.theme.Theme;
import org.springframework.boot.SpringApplication;
import org.springframework.boot.autoconfigure.SpringBootApplication;

@SpringBootApplication
@Theme("hilla-demo")
public class HillaDemoApplication implements AppShellConfigurator {

 public static void main(String[] args) {
  SpringApplication.run(HillaDemoApplication.class, args);
 }

}
Lastly, check your MainLayout to include navigational links to different views.
import {AppLayout} from '@hilla/react-components/AppLayout.js';
import {DrawerToggle} from '@hilla/react-components/DrawerToggle.js';
import Placeholder from 'Frontend/components/placeholder/Placeholder.js';
import {useRouteMetadata} from 'Frontend/util/routing.js';
import {Suspense, useEffect} from 'react';
import {NavLink, Outlet} from 'react-router-dom';

const navLinkClasses = ({isActive}: any) => {
    return `block rounded-m p-s ${isActive ? 'bg-primary-10 text-primary' : 'text-body'}`;
};

export default function MainLayout() {
    const currentTitle = useRouteMetadata()?.title ?? 'Trains Service';
    useEffect(() => {
        document.title = currentTitle;
    }, [currentTitle]);

    return (
        <AppLayout primarySection="drawer">
            <div slot="drawer" className="flex flex-col justify-between h-full p-m">
                <header className="flex flex-col gap-m">
                    <h1 className="text-l m-0">Train Service</h1>
                    <nav>
                        <NavLink className={navLinkClasses} to="/">
                            Trains
                        </NavLink>
                    </nav>
                </header>
            </div>

            <DrawerToggle slot="navbar" aria-label="Menu toggle"></DrawerToggle>
            <h2 slot="navbar" className="text-l m-0">
                {currentTitle}
            </h2>

            <Suspense fallback={<Placeholder/>}>
                <Outlet/>
            </Suspense>
        </AppLayout>
    );
}
Now we can run and check our service and see results.

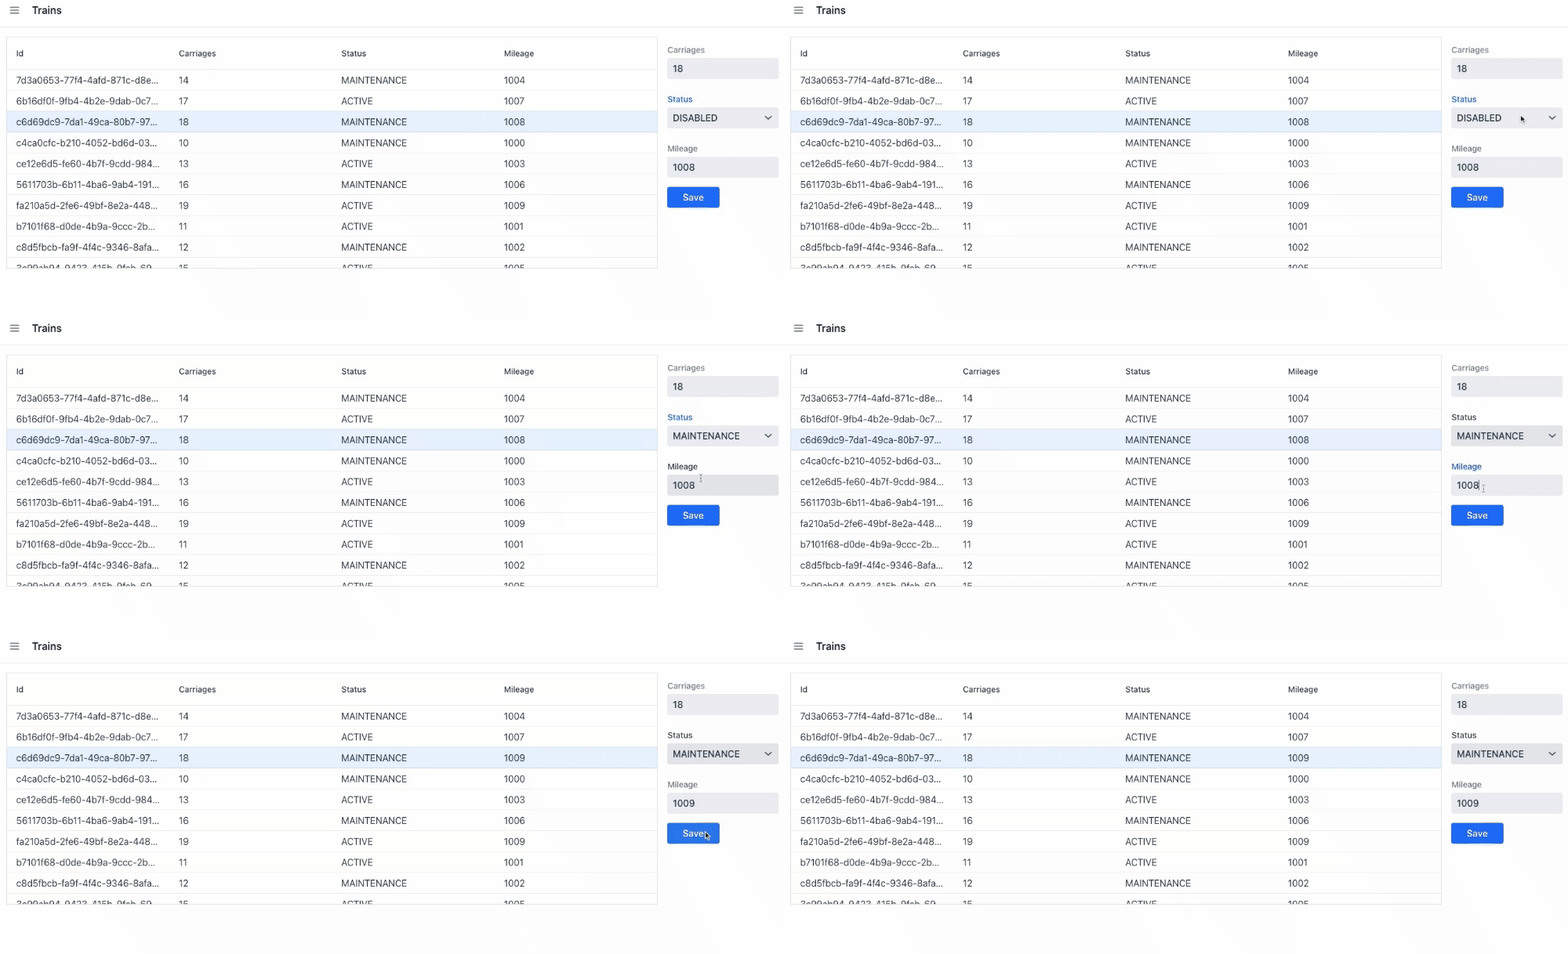
Let’s add some interactivity to update trains; we already have a backend for the update operations.
We will develop a form to edit trains.
import {Select} from "@hilla/react-components/Select";
import {Button} from "@hilla/react-components/Button";
import {useForm} from "@hilla/react-form";
import {useEffect, useState} from "react";
import TrainModel from "Frontend/generated/io/vrnsky/hillademo/dto/TrainModel";
import Train from "Frontend/generated/io/vrnsky/hillademo/dto/Train";
import {NumberField} from "@hilla/react-components/NumberField";
import Status from "Frontend/generated/io/vrnsky/hillademo/dto/Status";

interface TrainFormProps {
    train?: Train | null;
    onSubmit?: (trainModel: Train) => Promise<void>;
}

export default function TrainsForm({train, onSubmit}: TrainFormProps) {
    const {field, model, submit, reset, read} = useForm(TrainModel, {onSubmit});

    const statusValues = Object.values(Status);
    const statusOptions = statusValues.map(status => ({label: status, value: status}));


    useEffect(() => {
        read(train);
    }, [train]);


    return (
        <div className="flex flex-col gap-s items-start">
            <NumberField label="Carriages" {...field(model.carriages)} />
            <Select label="Status" items={statusOptions} {...field(model.status)} />
            <NumberField label="Mileage" {...field(model.mileage)} />


            <div className="flex gap-m">
                <Button onClick={submit} theme="primary">Save</Button>
            </div>
        </div>
    )
}
After implementation, we must include our form on our main page to open after the user clicks on the train.
import {useEffect, useState} from 'react';
import {TrainService} from "Frontend/generated/endpoints";
import {Grid} from "@hilla/react-components/Grid";
import {GridColumn} from "@hilla/react-components/GridColumn";
import Train from "Frontend/generated/io/vrnsky/hillademo/dto/Train";
import TrainsForm from "Frontend/views/trains/TrainsForm";

export default function TrainsView() {
    const [trains, setTrains] = useState<Train[]>([]);
    const [selected, setSelected] = useState<Train | null | undefined>();

    useEffect(() => {
        TrainService.list().then((trainsList) => {
            const validTrains = trainsList?.filter((train): train is Train => !!train) || [];
            setTrains(validTrains);
        });
    }, []);

    async function onTrainSaved(train: Train) {
        const saved = await TrainService.createTrain(train);
        if (saved && train.id) {
            setTrains(trains => trains.map(current => current.id === saved.id ? saved : current));
        } else if (saved) {
            setTrains(trains => [...trains, saved]);
        }
        setSelected(saved || undefined);
    }

    return (
        <div className="p-m flex gap-m">
            <Grid
                items={trains}
                onActiveItemChanged={e => setSelected(e.detail.value)}
                selectedItems={[selected]}>

                <GridColumn path="id"/>
                <GridColumn path="carriages"/>
                <GridColumn path="status"/>
                <GridColumn path="mileage"/>
            </Grid>
            {selected &&
                <TrainsForm train={selected} onSubmit={onTrainSaved}/>
            }

        </div>
    );
}
Now we can edit trains.

I hope you find this article helpful.
Conclusion
Most of the projects I have been working on were client-server architecture and teams of backend and front-end developers.
So, in my situation, there is no point in using Vaadin of Hilla. Still, if you have limited resources and want to build something with UI and you know React or want to learn it, you can employ Vaadin or Hilla for prototyping and production.