Mastering JUnit 5: Advanced Techniques for Efficient and Powerful testing
Explore cutting — edge features, best practices and framework comparisons to elevate your Java testing game.

Explore cutting — edge features, best practices to elevate your Java testing game.
Hello everyone in this article we will dive into note-worthy JUnit 5 annotations which help you to write extensive unit tests.
Before starting to start writing unit tests we have to add required dependencies to our pom.xml or build.gradle.
<?xml version="1.0" encoding="UTF-8"?>
<project xmlns="http://maven.apache.org/POM/4.0.0"
         xmlns:xsi="http://www.w3.org/2001/XMLSchema-instance"
         xsi:schemaLocation="http://maven.apache.org/POM/4.0.0 http://maven.apache.org/xsd/maven-4.0.0.xsd">
    <modelVersion>4.0.0</modelVersion>

    <groupId>me.vrnsky</groupId>
    <artifactId>mastering-junit</artifactId>
    <version>1.0-SNAPSHOT</version>

    <properties>
        <maven.compiler.source>17</maven.compiler.source>
        <maven.compiler.target>17</maven.compiler.target>
        <project.build.sourceEncoding>UTF-8</project.build.sourceEncoding>
    </properties>

    <dependencies>
        <dependency>
            <groupId>org.junit.jupiter</groupId>
            <artifactId>junit-jupiter-params</artifactId>
            <version>5.11.0</version>
            <scope>test</scope>
        </dependency>
        <dependency>
            <groupId>org.junit.jupiter</groupId>
            <artifactId>junit-jupiter-engine</artifactId>
            <version>5.11.0</version>
            <scope>test</scope>
        </dependency>
        <dependency>
            <groupId>org.junit.jupiter</groupId>
            <artifactId>junit-jupiter-api</artifactId>
            <version>5.11.0</version>
            <scope>test</scope>
        </dependency>
    </dependencies>

</project>
Parametrized Test
This article will follow test — driven development approach, so first, we will write a unit test. Most of the examples of test units contain examples of testing simple calculators, but for this example, we will develop a String utility class.
This type of tests allow to run the same test multiple times with different argument. It helps developers reduce code duplications and provide more comprehensive testing with less effort.
package me.vrnsky;

import org.junit.jupiter.api.Assertions;
import org.junit.jupiter.params.ParameterizedTest;
import org.junit.jupiter.params.provider.CsvSource;

class StringUtilsTest {

    @ParameterizedTest
    @CsvSource(value = {"a, 1, a", "b, 3, bbb", "c, 0, ''"})
    void testThatStringUtilsRepeatProduceCorrectOutput(String input, int count, String expected) {
        Assertions.assertEquals(expected, StringUtils.repeat(input, count));
    }
}
For now, our test code even cannot be compiled since there is no static method repeat. The next step is to implement it. The first naive implementation will do nothing useful just return null.
package me.vrnsky;

public class StringUtils {

    public static String repeat(String input, int count) {
        return null;
    }
}
As expected all three cases will fail.

After a little bit of refactoring our code looks like below.
package me.vrnsky;

public class StringUtils {

    public static String repeat(String input, int count) {
        return input.repeat(count);
    }
}
Now all tests are passed.
Dynamic Tests
Since in this article, we stick with the TDD approach first we must write our test.
One of my favourite feature — allows developers to generate tests programatically at runtime. This type of test is applicable when the number or nature of test isn’t known until execution time.

Before start writing the test we have to do two things:
- Create a Point class that describes the point.
- Create a PointTestData describing our test case.
package me.vrnsky;

public record Point(
        double x,
        double y
) {
}
Quite simply, move to the PointTestData class.
public static class PointTestData {
        private String testCaseName;
        private Point a;
        private Point b;
        private double expectedDistance;

        public PointTestData() {
        }


        public String getTestCaseName() {
            return testCaseName;
        }

        public void setTestCaseName(String testCaseName) {
            this.testCaseName = testCaseName;
        }

        public Point getA() {
            return a;
        }

        public void setA(Point a) {
            this.a = a;
        }

        public Point getB() {
            return b;
        }

        public void setB(Point b) {
            this.b = b;
        }

        public double getExpectedDistance() {
            return expectedDistance;
        }

        public void setExpectedDistance(double expectedDistance) {
            this.expectedDistance = expectedDistance;
        }
    }
So now, you can imagine how we will describe our test cases. You can do it with JSON or other formats is up to you. I will stick with the below example.
{
  "testCaseName": "Distance between (5.0, 5.0) and (10.0, 10.0)",
  "a": {
    "x": 5.0,
    "y": 5.0
  },
  "b": {
    "x": 10.0,
    "y": 10.0
  },
  "expectedDistance": 7.0710678118654755
}
At the moment our DistanceUtilsTest class contains only the class that represents our test cases.
For our test we will do three things:
- Collect all file paths inside the resources/distance directory
- Map data from JSON file and create dynamic tests
- Return stream of dynamic test
For the second step, we need to add Jackson’s dependency.
<dependency>
   <groupId>com.fasterxml.jackson.core</groupId>
   <artifactId>jackson-databind</artifactId>
   <version>2.17.2</version>
</dependency>
Now we can write the main logic of the test.
package me.vrnsky;

import com.fasterxml.jackson.databind.ObjectMapper;
import org.junit.jupiter.api.Assertions;
import org.junit.jupiter.api.DynamicTest;
import org.junit.jupiter.api.TestFactory;

import java.nio.file.Files;
import java.nio.file.Path;
import java.nio.file.Paths;
import java.util.List;
import java.util.stream.Stream;

class DistanceUtilsTest {

    private static final ObjectMapper OBJECT_MAPPER = new ObjectMapper();

    @TestFactory
    Stream<DynamicTest> createTests() throws Exception {
        List<String> files = Files.walk(Paths.get(getClass().getClassLoader().getResource("distances").toURI()))
                .filter(Files::isRegularFile)
                .map(Path::toString)
                .toList();

        Stream<DynamicTest> tests = Stream.of();
        for (String file : files) {
            tests = Stream.concat(tests, Stream.of(createDynamicTest(file)));
        }
        return tests;
    }

    private DynamicTest createDynamicTest(String pathToFile) throws Exception {
        byte[] content = Files.readAllBytes(Paths.get(pathToFile));
        PointTestData pointTestData = OBJECT_MAPPER.readValue(content, PointTestData.class);
        return DynamicTest.dynamicTest(
                pointTestData.getTestCaseName(), () -> {
                    Assertions.assertEquals(pointTestData.getExpectedDistance(), DistanceUtils.getDistance(pointTestData.getA(), pointTestData.getB()), 0.05);
                }
        );
    }

    public static class PointTestData {
        private String testCaseName;
        private Point a;
        private Point b;
        private double expectedDistance;

        public PointTestData() {
        }


        public String getTestCaseName() {
            return testCaseName;
        }

        public void setTestCaseName(String testCaseName) {
            this.testCaseName = testCaseName;
        }

        public Point getA() {
            return a;
        }

        public void setA(Point a) {
            this.a = a;
        }

        public Point getB() {
            return b;
        }

        public void setB(Point b) {
            this.b = b;
        }

        public double getExpectedDistance() {
            return expectedDistance;
        }

        public void setExpectedDistance(double expectedDistance) {
            this.expectedDistance = expectedDistance;
        }
    }
}
Nested Test
Nested test allow you to express the relationship between group of tests. Usage of nested tests help developers improve test organization and readability. They are particularly usful for scenario — based testing.
In this example, we will write a few nested test cases. This time we are going to implement password validator rules.
As usual, let’s start with tests.
package me.vrnsky;


import org.junit.jupiter.api.Assertions;
import org.junit.jupiter.api.Nested;
import org.junit.jupiter.api.Test;

class PasswordValidatorTest {

    @Nested
    class NotEmptyPasswordRule {
        PasswordRule passwordRule = new NotEmpty();

        @Test
        void testNonEmptyPasswordRule() {
            Assertions.assertFalse(passwordRule.isValid("", "Password is empty!"));
        }
    }
}
Since there are no classes such as PasswordValidator, NotEmpty, and PasswordRule interface let’s create it. Firstly, we will create the interface PasswordValidator.
package me.vrnsky.rules;

public interface PasswordRule {

    boolean isValid(String password, String message);
}
Then implement this interface within the NotEmpty class.
package me.vrnsky.rules;


public class NotEmpty implements PasswordRule {
    @Override
    public boolean isValid(String password, String message) {
        if (password == null || password.isEmpty()) {
            System.out.println(message);
            return false;
        }
        return true;
    }
}
For the sake of simplicity, we just return null and print the message to the standard output. Do not write in this way in production code — use logger secondly, it is up to the project architecture to return false or throw an exception.
After these changes, our test passed successfully. Let’s add one more rule — LengthRule.
@Nested
    class LengthPasswordRule {
        PasswordRule passwordRule = new LengthRule(5);

        @Test
        void testNonEmptyPasswordRule() {
            Assertions.assertFalse(passwordRule.isValid("", "Password length is less then required!"));
        }
    }
The implementation of LengthRule is presented below.
package me.vrnsky.rules;

public class LengthRule implements PasswordRule {

  private final int minLength;

  public LengthRule(int minLength) {
    this.minLength = minLength;
  }

 @Override
 public boolean isValid(String password, String message) {
   if (password.length() < minLength) {
     System.out.println("Password length is not enough");
      return false;
   }
   return true;
 }
}
Extension model
The extensions on its way to help developer to customize test behavior. The extension can be used for setup, teardown, parameter resolutions, and more.
@ExtendWith(TimingExtension.class)
class MyTest {
    @Test
    void testMethod() {
        // This test will be timed
    }
}

class TimingExtension implements BeforeTestExecutionCallback, AfterTestExecutionCallback {
    private static final Logger logger = LoggerFactory.getLogger(TimingExtension.class);

    @Override
    public void beforeTestExecution(ExtensionContext context) throws Exception {
        context.getStore(Namespace.create(getClass(), context.getRequiredTestMethod()))
               .put("start time", System.currentTimeMillis());
    }

    @Override
    public void afterTestExecution(ExtensionContext context) throws Exception {
        long startTime = context.getStore(Namespace.create(getClass(), context.getRequiredTestMethod()))
                                .remove("start time", long.class);
        long duration = System.currentTimeMillis() - startTime;

        logger.info("Test {} took {} ms.", context.getRequiredTestMethod().getName(), duration);
    }
}
Conditional test execution
Not each test should be executed on all environments for this reason we can manage test execution through conditional test executions. For example, we can instruct JUnit to run unit — test only if environment is MacOS, for example.
@Test
@EnabledOnOs(OS.MAC)
void testOnlyOnMacOS() {
    // This test only runs on macOS
}
Timeouts
JUnit 5 as JUnit 4 allows developer yo set timouts to prevent long — running tests from blocking your test suite.
@Test
@Timeout(value = 500, unit = TimeUnit.MILLISECONDS)
void testWithTimeout() {
    // This test will fail if it takes longer than 500 milliseconds
}
Parallel Execution

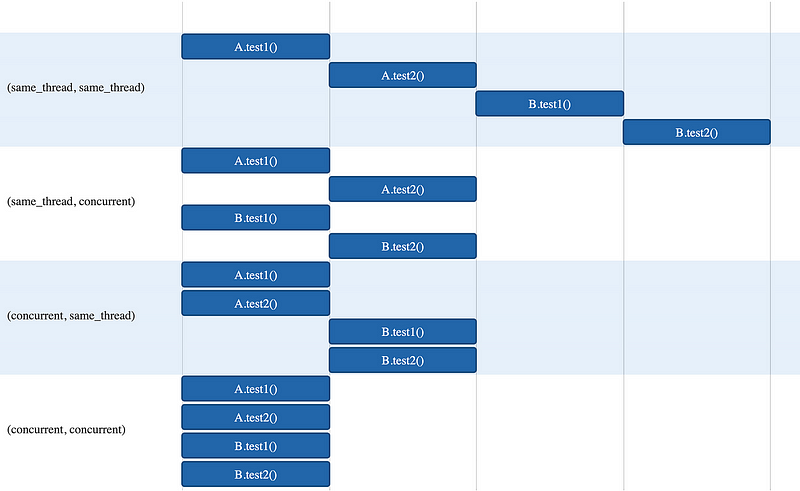
By default, JUnit 5 runs tests sequentially in a single thread. This means that tests within a test class, and across different test classes, are executed one after another in a single thread. There are three types of execution strategy
- dynamic — Computes the desired parallelism based on the number of available processors/cores multiplied by the junit.jupiter.execution.parallel.config.dynamic.factor configuration parameter (defaults to 1)
- fixed — Uses the mandatory junit.jupiter.execution.parallel.config.fixed.parallelism configuration parameter as the desired parallelism
- custom — Allows you to specify a custom ParallelExecutionConfigurationStrategy implementation via the mandatory junit.jupiter.execution.parallel.config.custom.class configuration parameter to determine the desired configuration.
Let’s configure our test to run with a dynamic execution strategy — add these properties to your pom.xml or build.gradle.
<junit.jupiter.execution.parallel.enabled>true</junit.jupiter.execution.parallel.enabled>
<junit.jupiter.execution.parallel.config.strategy>dynamic</junit.jupiter.execution.parallel.config.strategy>
For more detailed explanation about different execution strategy read article by Francisco Maria
https://blog.devgenius.io/junit5-parallelization-of-parameterized-tests-only-57ddb00233fa
Repeated tests
Repeated tests allow you to run a test multiple times. This is useful for testing consistency or for performance testing.
Repeated tests help developers run tests multiple times. This is very helpful for testing consistency or for performance testing.
@RepeatedTest(5)
void testRepeatedStringRepeatProduceCorrectOutput() {
  Assertions.assertEquals("aa", StringUtils.repeat("a", 2));
}
This test will be executed 5 times.

Test lifecycle callbacks

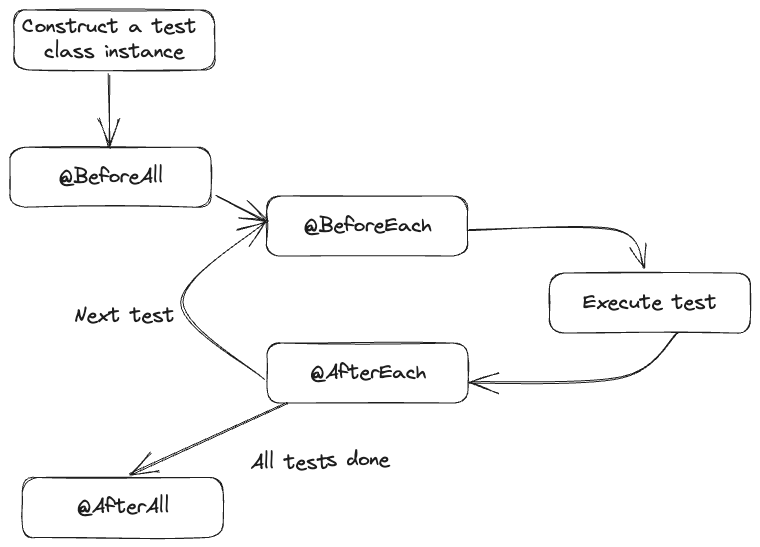
JUnit 5 provides a rich set of lifecycle callbacks that allow you to execute code at specific points during the test execution process. These callbacks are particularly useful for setting up test environments, managing resources, and cleaning up after tests.
Here are the main lifecycle callbacks:
There are four main lifecycle callbacks:
BeforeAll
- Executed once before all test methods in the class
- Must be static
- Most of the developers use this method for expensive setup operations.
AfterAll
- Executed once after all test methods in the class have been run.
- Must be static
- In this method, developers perform clean-up operations.
BeforeEach
- Executed before each test method.
- Used for setting up test fixtures specific to each test.
AfterEach
- Executed after each test method.
- Used for cleaning up operations.
Example:
import org.junit.jupiter.api.*;

class LifecycleCallbacksDemo {

    @BeforeAll
    static void initAll() {
        System.out.println("Initializing test suite");
        // Initialize resources shared by all tests
        // e.g., database connections, server startup
    }

    @BeforeEach
    void init() {
        System.out.println("Initializing test method");
        // Set up test fixtures
        // e.g., initializing test data, resetting state
    }

    @Test
    void firstTest() {
        System.out.println("Running first test");
        Assertions.assertTrue(true);
    }

    @Test
    void secondTest() {
        System.out.println("Running second test");
        Assertions.assertFalse(false);
    }

    @AfterEach
    void tearDown() {
        System.out.println("Tearing down test method");
        // Clean up after test
        // e.g., resetting state, clearing test data
    }

    @AfterAll
    static void tearDownAll() {
        System.out.println("Tearing down test suite");
        // Clean up shared resources
        // e.g., closing database connections, shutting down servers
    }
}
Conclusion:
JUnit5 5 offers a rich set of features that improve the testing experience. Features like repeated tests allow developers to verify consistency and performance. Lifecycle callbacks provide fine-grained control over setup and teardown operations. There are plenty of features that have not been covered in this article that can improve your test code quality and readability. In conclusion, JUni5 is a powerful tool for creating robust and maintainable test suites in Java applications.